Total Pageviews

Tuesday, July 6, 2010

Healthy Diet : Kimchi


Kimchi....
hehehe...aku just tried it last Sunday, 4th July at a Korean Restaurant di The Garden Mid Valley....not bad....memang sedap dan rasa masam2 pedas serta hot.....malam tu puas hati aku melawas....memang bersihkan perut, its not like taking ubat julap atau teh orang kampung yang menyakitkan....its about having something yang purely natural....no wonder, dalam drama Kim Sam Soon ada cakap:

"Kenapa laa tuhan ada menciptakan makanan sesedap ini (Kimchi), tak tahan nafsu nak dikawal"

By the way.... apa itu Kimchi?

Kimchi (Hangul: 김치, gimchi) adalah makanan tradisional Korea, salah satu jenis sayur masin hasil pemeraman yang dibuat dengan mencuci sayuran yang sudah digaram dan memerap dengan bahan-bahan seperti udang kering, sos ikan, bawang putih, halia dan serbuk cili merah.

Sayuran yang biasa digunakan untunk dibuat kimchi adalah sawi putih dan lobak. Katanya zaman2 dulu nun, kimchi dipanggil sebagai chim-chae (Hangul: 침채; Hanja: 沈菜) yang bermaksud "sayuran yang direndam."

Di Korea, kimchi selalu dihidangkan pada waktu makan dengan hampir semua masakan. Kimchi juga digunakan sebagai ramuan sewaktu memasak sup kimchi kimchi jjigae, nasi goreng kimchi kimchi bokkeumbap dan pelbagai masakan lain.

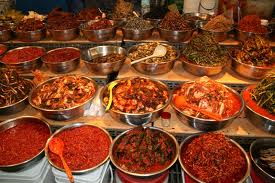
Kimchi terdiri dari ratusan jenis dengan ciri khas aroma yang keras, tajam, dan menyengat.

Makanan hebat ini dibuat dari bermacam jenis bahan sesuai dengan jenis kimchi dan selera orang yang membuatnya. Kimchi yang paling terkenal di luar Korea adalah Baechu Kimchi yang dibuat dari sawi putih (배추, baechu) dan lobak (무, mu) dicampur bawang putih (마늘, maneul), cili merah (빨간고추, ppalgangochu), daun bawang (파, pa), sotong (오징어 ojingeo), tiram (굴, gul) atau makanan laut lain, halia (생강, saenggang), garam (소금, sogeum), dan gula (설탕, seoltang).


Add Image
Note: The Raw ingredients of Kimchi.


Note: Bahan-bahan yang telah dibelah dan diasingkan sebelum digaul.


Di negara asalnya, terdapat lebih kurang 200 jenis kimchi termasuk kimchi khas daerah dan kimchi sayuran bermusim. Muzium Ladang Kimchi yang terletak di Seoul mencatatkan 187 jenis kimchi, dari kimchi zaman dahulu hingga kimchi zaman sekarang. Kepelbagaian jenis kimchi yang mudah dikenali, misalnya: 깍두기, kkakdugi dengan bahan utama lobak tanpa sawi putih, 오이소배기, kimchi timun yang disebut oisobaegi, dan kkaennip (susunan daun perilla yang direndam dengan kicap, cili merah, bawang putih, daun bawang, dan bahan-bahan penyedap lain).

Bakteria Laktobasilus yang berperanan dalam proses pemeraman kimchi menghasilkan asid laktat dengan kadar yang lebih tinggi daripada yogurt.

Kimchi disebut sebagai salah satu dari lima "makanan tersihat" di dunia menurut majalah Health Magazine. Kimchi kaya dengan vitamin, membantu pencernaan, dan berkemungkinan dapat mencegah barah. Sayuran yang sudah lama diketahui baik untuk kesihatan, apatah lagi ditambah bakteria hidup pada kimchi yang lebih banyak dari yogurt. Penggunaan cili merah dengan banyak dalam kimchi juga sering disebut-sebut baik untuk kesihatan.

Menurut pengkaji di Universiti Kebangsaan Seoul, terdapat beberapa bukti yang menunjukkan kimchi mungkin dapat digunakan untuk mengubati burung yang terjangkit selsema burung. Ayam yang dijangkiti selsema burung sebanyak 13 ekor diberi makan pati kimchi dan 11 ekor antaranya mula sembuh seminggu kemudian. Tetapi ketika ini tiada bukti penelitian yang sama boleh digunakan untuk mengubati manusia.

Kebaikan kimchi untuk kesihatan manusia terus menjadi kontroversi kerana kimchi kadang-kadang dikaitkan dengan pelbagai kesan buruk pada kesihatan.

Happy Cooking!

Wednesday, June 30, 2010

My Yoga Obsession: Meditation


Meditation.... is a pose that can enhance your inner sense consciousness beside releasing most of your pain in your back and neck if it be practiced in a correct manner and way as well as body posture.

Ehem....tetiba nak speaking....okay, i mix je English and Malay as usual....Meditasi cara i lebih kepada meditasi mixing dengan memasukkan elemen selawat dan hypnosis, bagi meransang minda berfikir dan sedar tentang keadaan sekeliling disamping mengawal peredaran fikiran dan atom2 di dalam saraf.


Amalan meditasi akan jadi lebih baik kalau disertakan dengan music yoga yang slow motion dan easy listening, especially music yoga yang memiliki bunyi air yang mengalir kerana ia boleh memudahkan akal kita melakukan bayangan ketika bermeditasi....

bagi memulakan....meditasi...ehem...ehem.... duduk macam i duduk kat bawah ni:


kalau rasa susah sangat just duduk bersila macam biasa ala2 orang ratib tu....
macam baby kat bawahni:


gurau je...hehehe....

okay now we begin:


Get into confortable cross leg seated position,Adjust your posture so that your spine is upright, yet your body feels relaxed. Rest your hands in your lap or on your thighs, with the palms facing up, Close your eyes and bring your attention to your breathing....(ala2 doktor je)...


Note: My lotus cross leg seating

Dalam posture duduk bersila di atas, saya melakukan duduk dengan cross leg secara lotus....dengan menyimpulkan kedua2 belah kaki ke peha berlawanan....tapi bagi u all yang masih baru, just seat nice and tall dalam keadaan simple cross leg pun okay...my style of seating ni just nak challenge inner self je to enjoy the pain agar lebih fokus...


Mulakan pernafasan dengan membayangkan udara keluar masuk...seduatan nafas dengan kiraan 5 dan hembus dengan kiraan 10. better to add up with zikir (for muslim) dalam keadaan mata dipejam dan bayangan nafas keluar masuk, mulakan berzikir dengan


Astaghfirullahalazim allazi laa ilahaillaa huwalhayyul qoyyum waatubuilai.....

jika boleh, cuba baca 3 kali bagi setiap nafas di dalam hati.....bayangkan setiap kali nafas ... , alunan zikir dimulut meresap masuk ke udara yang disedut dan mula masuk ke saluran tekak dan seterusnya ke peparu, kemudian dari peparu meresap ke saluran darah kemudian ke jantung dan terus ke saraf tunjang dari situ bergerak ke otak dan tersebar disegenap ceruk otak, di mana kita bayangkan ianya meresap ke setiap genap sudut otak dan berputar meresapi setiap ruang, begitu juga dibayangkan aliran nafas resapan zikir tadi pergi ke hati dan berputar merawat segala ketidakkeruan, kegelisahan, ketidak tenangan, perasaan benci serta dendam dan seterusnya ke seluruh organ lain badan......


teruskan dengan hembusan dalam kiraan 10, pada ketika hembusan bayangkan segala hasil resapan tadi yang negatif dihembus keluar dari badan dan hilang ditiup angin dengan juga membayangkan perut kembang dan kempis, turun dan naik....sebagai satu cara hembusan sambil menolak segala perkara negatif keluar...

di sini anda bukan sahaja melakukan meditasi malah pada masa yang sama berselawat dan melakukan hypnosis ke atas segenap organ badan anda bagi setiap hembusan....

Setelah selesai anda akan rasa pernafasan anda lebih lapang, segar dan salur pernafasan berasa luas dan sejuk...

amalan ini bagus dilakukan diwaktu pagi especially ketika matahari terbit....


Monday, June 14, 2010

My Yoga Obsession: Sun Solutation

Sun Solutation - gerakan imbangan dan kawalan minda

Salah satu gerakan yoga yang memang memenatkan dengan ulangan sekurang-kurangnya 3 kali, gerakan ini dapat menguatkan kaki, bahagian bawah belakang malah imbangan badan. Among my favourite pose.

Sebaik-baiknya dimulakan dengan bernafas menggunakan teknik Yujaya iaitu melakukan sedutan dan hembusan melalui hidung....tetapi dengan mengecilkan salur pernafasan setiap kali hembusan....sebaik-baiknye bernafas dengan sedutan dalam kiraan 5 inhale dan hembusan dalam kiraan 10 exhale.

diteruskan dengan meditasi, as for me dilakukan dengan duduk dalam posisi pigeon post dan includekan zikir dan selawat di dalam hati dengan membayangkan aura zikir dan selawat yang dibaca dan dibayangkan itu mengalir dari sedutan nafas yang perlahan melalui hidung ke peparu dan menyerap ke seluruh badan melalui peparu dan saluran darah.....


Gerakan 1: Mountain Post


Begin by standing in Mountain pose, feet about hip width apart, hands either by your sides or in prayer position. Take several deep breaths.

Gerakan 2: Hands Up


On your next inhale, in one sweeping movement, raise your arms up overhead and gently arch back as far as feels comfortable and safe.


Gerakan 3: Head To Knees


As you exhale, bend forward, bending the knees if necessary, and bring your hands to rest beside your feet.

Gerakan 4: Lunge


Inhale and step the right leg back, go deeper by putting your back leg straight to the floor. breath slowly

Gerakan 5: Plank


Exhale and step the left leg back into plank position. Hold the position and inhale.

Gerakan 6: Chaturangga or stick


Exhale and lower yourself as if coming down from a pushup. Only your hands and feet should touch the floor.

Gerakan 7: Upward Dog


Inhale and stretch forward and up, bending at the waist. Use your arms to lift your torso, but only bend back as far as feels comfortable and safe. Lift your legs up so that only the tops of your feet and your ahnds touch the floor. It's okay to keep your arms bent at the elbow. Option di sini boleh juga dilakukan gerakan Cobra bagi menggantikan Upward Dog:


Gerakan 8: Downward Dog

Posisi 1


Posisi 2


Exhale, lift from the hips and push back and up.
Cara terbaik dalam gerakan ini ialah dengan memastikan kedudukan betul-betul seperti huruf 'v' yang diterbalikkan.


Gerakan 9: Kembali kepada posisi Lunge


Inhale and step the right leg back, go deeper by putting your back leg straight to the floor. breath slowly.

Gerakan 10: Head to Knees


As you exhale, bend forward, bending the knees if necessary, and bring your hands to rest beside your feet.


Gerakan 11: Hands Up


Inhale and rise slowly while keeping arms extended.

Gerakan 12: Kembali ke 'Mountain Post'.


Exhale, and in a slow, sweeping motion, lower your arms to the sides. End by bringing your hands up into prayer position. Repeat the sequence, stepping with the left leg.

Selamat Mencuba.....

Wednesday, May 19, 2010

My Yoga Obsession: Yoga For Hair Loss


I was just surfing around the internet until i suddenly found a web mentioning alot oftips that related to Yoga, in fact it has really attracted me to explore more as i realize what i need to do to continue remember to tips so that i could practise it.

Its all about yoga for hair loss;
If you are suffering from hair loss and you don’t want to go under the knife, then yoga could be the answer. According to some yoga gurus, there is little solution for hair loss problems in western medicine. Hair loss in men & women is a universal phenomena caused by hereditary problems, poor diets, stress etc. Only one western prescription product minoxidil has some acceptance as a cure of hair loss. However minoxidil has little or no effect when there is actual baldness rather than thinning.

Yoga postures can help you overcome stress, anxiety, and indigestion, poor blood circulation in head, which are considered as main causes of hair loss.

Headstand yoga pose can be very helpful as it contributes blood circulation in head as well as relieves tension.


(Note: The above is my Picture....)

Following are some of the of yogas which can help you to remove stress and improve blood circulation in head.

* Downward facing dog:


* Standing forward bend:


* Camel pose:


* Shoulder stand:


* The Knee to Chest (Pawanmuktasana):


Hair loss can be due dissimilar reasons like heredity, stress, genetic problems, hormonal imbalances, pollution, excessive use of chemicals and styling products and imbalanced diet. Yoga, pranayama and thought are very beneficial to reduce the daily stress and thus helps to reduce the hair loss directly. Yoga asana like vajrasana and pawanmuktasana are especially beneficial to control hair loss. If you are suffering from hair loss and you don't want to go under the knife, then yoga could be the answer. According to some yoga gurus, there is little solution for hair loss problems in western medicine. Hair loss in men & women is a worldwide phenomena caused by hereditary problems, poor diets, stress etc. Only one western prescription product minoxidil has some acceptance as a cure of hair loss. However minoxidil has little or no effect when there is actual baldness rather than thinning.


Benefits


• As the stomach is pressed and then allowed to go limp in this asana , the liver , urinary bladder, spleen, intestines and stomach are well exercised by it.

• Helps one to get rid of constipation, improve appetite, releases wind and reduces flatulence.


Description of This asana

1. Lie down on a mat . Exhale and stop mouthful of air. Lift left leg, bend it and bring it up to the stomach. Let the knee touch the chin , with the rest of the leg touching the chest, press down on the leg, so that the stomach and chest receive pressure.


2. Lift your neck and place your chin on the knee. Remain in this position as long as you can hold your breath. Then breath slowly, and straighten you leg. Put your head back on the floor.


3. Repeat with the exact leg.


4. Repeat the same with the both legs.


5. Repeat the whole operation three times.


*Vajrasana


Benefits


• It ensures digestion and prevents excess wind shape.

Caution

• Those suffering from knee pain should not practise this asana.


Description of the asana


1. Sit on your knees keeping them together.

2. Draw both toes together, and with heels apart, sit on them.Keep your hands straight on the respective knees.

3. Breathe normally with your spine straight. Relax your hands and release the legs

4. Now lie on your back or stretch your legs in front with hands at the back and relax.

5. Take rest for 10 counts and replicate.

6. Do this two times.


Meditation

Meditation is another way to overcome hair loss problem as it can control stress. Sit in proper pose and observe your breathing.

Home Remedies for Hair Loss


1. Boil one cup mustard oil by means of four tablespoon heena (mehendi) leaves. Filter it and keep it in a bottle. Message it on the bald patches regularly. It is very effective natural remedy for baldness.


2. Grind fenugreek seeds with water and be relevant on the head. Leave for at least 40 minutes before washing. carry on it for a month.


3. Do a vigorous rubbing of the scalp with fingers after washing the hair with cold water. It is also a good natural hair loss treatment.


4. Rub the bald area with onions till it becomes red. Then apply honey on the bald area. It is very effective natural cure for baldness


5. Make a mixture of honey with egg yolk. correctly massage on the scalp and hairs. Leave for a 1/2 hour, then clean


6. Prepare a home made shampoo by addition 5 tbsp of curd, 1 tbsp of lemon juice and 2 tbsp of gram raw (chholia) powder. Apply it on the cranium for an hour and then wash


7. Apply fresh leaf juice of amaranth to the hair. It will help the expansion of the hair and keep it soft.


So lets try the tips, i believe yang menentukan segala-galanya adalah Allah S. A. W., kita hanya mampu berusaha dan merancangnya.....


Good Luck.....


Next: My Yoga Obsession: Sun Salutation


Tuesday, May 18, 2010

Yoga- The Obsession


CURRENTLY, In May 2010,
I realize that i am obsessed with Yoga. I practise my yoga almost 6 times perweek in 6 class session with 6 session with 4 yoga instructor ( Miss Hui (Monday), Dr Amin (Tuesday), Mdm Mandy (Friday and Sunday) and Mr Joseph (Saturday)), memang aku tak miss my yoga class except if i have urgency yang tak dapat nak tolak, practise yoga walaupun menyakitkan, namun patient dan semangat seolah-olah menutupi segala kesakitan itu...aku terasa ketenangan dan keasyikan ketika melakukan gerakan yang rata2 memang sukar untuk ku serasikan dengan tubuhku....in fact i am happy with what i am doing....

Berikut, aku ingin berkongsi beberapa pose yang telah berjaya aku kuasai:

Crane Pose

Pose 1


Pose 2


The pose will provide s compact arm balance, Crane Pose tones and strengthens the abdominal organs and arms.

How to do it? Here are the step by step instructions:

STEP 1
Squat down from Tadasana with your inner feet a few inches apart. If it isn't possible to keep your heels on the floor, support them on a thickly folded blanket. Separate your knees wider than your hips and lean the torso forward, between the inner thighs. Stretch your arms forward, then bend your elbows, place your hands on the floor and the backs of the upper arms against the shins.

STEP 2
Snuggle your inner thighs against the sides of your torso, and your shins into your armpits, and slide the upper arms down as low onto the shins as possible. Lift up onto the balls of your feet and lean forward even more, taking the weight of your torso onto the backs of the upper arms. In Bakasana you consciously attempt to contract your front torso and round your back completely. To help yourself do this, keep your tailbone as close to your heels as possible.

STEP 3
With an exhalation, lean forward even more onto the backs of your upper arms, to the point where the balls of your feet leave the floor. Now your torso and legs are balanced on the backs of your upper arms. As a beginner at this pose, you might want to stop here, perched securely on the bent arms.

STEP 4
But if you are ready to go further, squeeze the legs against the arms, press the inner hands firmly to the floor and (with an inhalation) straighten the elbows. Seen from the side the arms are angled slightly forward relative to the floor. The inner knees should be glued to the outer arms, high up near the armpits. Keep the head in a neutral position with your eyes looking at the floor, or lift the head slightly, without compressing the back of the neck, and look forward.

STEP 5
Stay in the pose anywhere from 20 seconds to 1 minute. To release, exhale and slowly lower your feet to the floor, back into a squat.

Urdhva Dhanurasana (Upward Bow or Wheel Pose)

Pose 1


Pose 2


Pose 3 - Extension


The pose will strengthens the arms, legs, abdomen, and spine, and gives a boost of energy.

How to do it? Here are the step by step instructions:

STEP 1
Lie supine on the floor. Bend your knees and set your feet on the floor, heels as close to the sitting bones as possible. Bend your elbows and spread your palms on the floor beside your head, forearms relatively perpendicular to the floor, fingers pointing toward your shoulders.

STEP 2
Pressing your inner feet actively into the floor, exhale and push your tailbone up toward the pubis, firming (but not hardening) the buttocks, and lift the buttocks off the floor. Keep your thighs and inner feet parallel. Take 2 or 3 breaths. Then firmly press the inner hands into the floor and your shoulder blades against the back and lift up onto the crown of your head. Keep your arms parallel. Take 2 or 3 breaths.

STEP 3
Press your feet and hands into the floor, tailbone and shoulder blades against your back, and with an exhalation, lift your head off the floor and straighten your arms. Turn the upper thighs slightly inward and firm the outer thighs. Narrow the hip points and lengthen the tailbone toward the backs of the knees, lifting the pubis toward the navel.

STEP 4
Turn the upper arms outward but keep the weight on the bases of the index fingers. Spread the shoulder blades across the back and let the head hang, or lift it slightly to look down at the floor.

STEP 5
Stay in the pose anywhere from 5 to 10 seconds or more, breathing easily. Repeat anywhere from 3 to 10 times.


Feathered Peacock Pose

Pose 1


Pose 2


This pose is also commonly called Forearm or Elbow Balance.

How to do it? Here are the step by step instructions:

STEP 1
Perform a modified Adho Muhka Svanasana at your yoga wall, with your palms and forearms on the floor. Your fingertips should be right at the base of the wall, and your forearms parallel to each other at shoulder width. This pose isn't quite as scary as Adho Mukha Vrksasana; it has a firmer base of support, and the head isn't as far away from the floor. But it can still be somewhat intimidating. To ready yourself for and secure yourself in this inversion, firm your shoulder blades against your back torso and pull them toward your tailbone. Then rotate your upper arms outward, to keep the shoulder blades broad, and hug your forearms inward. Finally spread your palms and press your inner wrists firmly against the floor.

STEP 2
Now bend one knee and step the foot in, closer to the wall (let's say the left leg), but keep the other (i.e. right) leg active by extending through the heel. Then take a few practice hops before you try to launch yourself upside down. Sweep your right leg through a wide arc toward the wall and kick your left foot off the floor, immediately pushing through the heel to straighten the leg. Hop up and down like this several times, each time pushing off the floor a little higher. Exhale deeply each time you hop.

STEP 3
Hopping up and down like this may be all you can manage for now. Regularly practice your strength poses, like Adho Mukha Svanasana (or the modified version that's the beginning position here), Plank Pose, and Chaturanga Dandasana. Eventually you'll be able to kick all the way into the pose. At first your heels may crash into the wall, but again with more practice you'll be able to swing your heels up lightly to the wall.

STEP 4
If your armpits and groins are tight, your lower back may be deeply arched. To lengthen it, draw your front ribs into your torso, reach your tailbone toward your heels, and slide your heels higher up the wall. Draw the navel toward the spine. Squeeze the outer legs together and roll the thighs in. In Pincha Mayurasana your head should be off the floor; hang it from a spot between your shoulder blades and gaze out into the center of the room.

STEP 5
Stay in the pose 10 to 15 seconds. Gradually work your way up to 1 minute. When you come down, be sure not to sink onto the shoulders. Keep your shoulder blades lifted and broad, and take one foot down at a time with an exhalation. Lift into Adho Mukha Svanasana for 30 seconds to a minute. We tend to kick up with the same leg all the time: be sure to alternate your kicking leg, one day right, next day left.


Salamba Sirsasana (Supported Headstand)


Standing on your head in proper alignment calms the brain and strengthens the body.

How to do it? Here are the step by step instructions:

STEP 1
Use a folded blanket or sticky mat to pad your head and forearms. Kneel on the floor. Lace your fingers together and set the forearms on the floor, elbows at shoulder width. Roll the upper arms slightly outward, but press the inner wrists firmly into the floor. Set the crown of your head on the floor. If you are just beginning to practice this pose, press the bases of your palms together and snuggle the back of your head against the clasped hands. More experienced students can open their hands and place the back of the head into the open palms.

STEP 2
Inhale and lift your knees off the floor. Carefully walk your feet closer to your elbows, heels elevated. Actively lift through the top thighs, forming an inverted "V." Firm the shoulder blades against your back and lift them toward the tailbone so the front torso stays as long as possible. This should help prevent the weight of the shoulders collapsing onto your neck and head.

STEP 3
Exhale and lift your feet away from the floor. Take both feet up at the same time, even if it means bending your knees and hopping lightly off the floor. As the legs (or thighs, if your knees are bent) rise to perpendicular to the floor, firm the tailbone against the back of the pelvis. Turn the upper thighs in slightly, and actively press the heels toward the ceiling (straightening the knees if you bent them to come up). The center of the arches should align over the center of the pelvis, which in turn should align over the crown of the head.

STEP 4
Firm the outer arms inward, and soften the fingers. Continue to press the shoulder blades against the back, widen them, and draw them toward the tailbone. Keep the weight evenly balanced on the two forearms. It's also essential that your tailbone continues to lift upward toward the heels. Once the backs of the legs are fully lengthened through the heels, maintain that length and press up through the balls of the big toes so the inner legs are slightly longer than the outer.

STEP 5
As a beginning practitioner stay for 10 seconds. Gradually add 5 to 10 seconds onto your stay every day or so until you can comfortably hold the pose for 3 minutes. Then continue for 3 minutes each day for a week or two, until you feel relatively comfortable in the pose. Again gradually add 5 to 10 seconds onto your stay every day or so until you can comfortably hold the pose for 5 minutes. Come down with an exhalation, without losing the lift of the shoulder blades, with both feet touching the floor at the same time.


Have A Successful Try!


Sampai Syurga